Sunday, November 14, 2021

The 3D printed Blackriver 4x5 View Camera

To start in wet plate photography you need the basic chemicals, plates and a working camera. The size of the images you want to make determines the size of the film/plate holder and ultimately the size of the camera. 

I thought 4x5 inches would be a good size to start as the plates & chemicals required are less expensive and I could afford to make more mistakes! ( I was assured there would be many while I learnt, they weren't wrong )

While there are deals to be found for large format camera if you want one straight away they can cost from $300 to, well ... as much as you would like to pay.

I didn't really like the sound of waiting around till I found a deal so I paged through Thingiverse till I found the BlackRiver 4x5 View Camera v1.0

There were a lot of parts that had to be printed accurately but I decided to give it a try.


My BlackRiver 4x5 View Camera
There were some mechanical parts which had to be purchased but they were also
used in 3D printers and were available at a modest price. Binder clips were used to secure parts together which might need to be changed or rearranged and standard metric nuts and bolts completed the build.

To save expense with the lens I acquired a Russian lens via Ebay without a shutter since the exposure times with wet plate are long enough that they can be timed by hand using the lens cap to uncover and cover the lens.

My 4x5 plate holder
Since this camera was designed for film I needed a plate holder that would suit the thicker aluminum or glass plates I planned to use. 

Again Thingiverse came to the rescue and provided plans for a 4x5 plate holder, after a few modifications to improve its light-tightness its been working well.

It turned out that the 3D printed dark slide could not completely block full sunlight and I ended up using a trimmed down Graflex dark slide

Wet Plate Photography

 I've been interested in photography since I was a teenager in highschool and started developing my own film and prints. Being able to manage the process myself freed me from the dependency and cost of commercial processing. There remained the matter of buying film and paper ... so I was still tied to the local photographic supply store.

Recently, and what feels like a lifetime later, I've discovered the historic process of wet plate photography and freed myself from photo labs and photographic supply stores all together

The wet-plate photographic process originates in 1851 and largely replaced the
previous Daguerreotype process which relied on mercury vapor to develop the plates. 

The most common wet plate process, ferrotype, involves coating a black metal plate with a film of collodion in which bromide and/or iodine compounds are added. Its then placed in a bath of silver nitrate where it develops light sensitive silver halides. 

While the plate is still damp it is placed in a camera, exposed to the view through the lens and then developed before the plate has dried. Once developed, the image is fixed with a "hypo" solution to remove any remaining light sensitive compounds and finally dried and coated with a varnish to protect the layer of metallic silver which forms the image.


Unlike the more modern film negatives, this process results in a positive image made up of bright metallic silver deposites on a black background. The lightest part of the original image producing the largest deposits of silver on the plate while dark areas remain black as the surface of the plate.


Originally tin plates would have been used which were coated with Japanning (A black lacquer containing asphaltum) but now most photographers will use trophy aluminium, plates coated with a black film which can be laser etched. They serve perfectly for wet plate photography and are of a very consistent quality. 

The resulting photograph is unique to the wet plate process. The emulsion is only sensitive to UV light, blue ... and to a small extent green light.

In addition to recording light differently to modern black and white film, the image is reversed from left to right. Your face will appear the same way you view it in a mirror.

3D modeling and printing


One thing I'm thankful occurred in my lifetime has been the widespread use of 3D printing at a cost-point that is accessible to hobbyists and makers. Its given many people the ability to go from a design in their head to an accurate physical model in hours. Alternately, designs can be shared online between those who have the resources to create technical designs and end users who can simply download a design and print it on their printer (or one in a library, etc)

As global health emergencies have impacted our way of life, the ability to quickly produce needed articles of PPE equipment or lifesaving hardware locally has been invaluable.

I've participated by 3D printing articles of PPE equipment and donating them to local medical facilities. I've been able to print designs that were created half a world away or practically next door, all shared through repositories like www.thingaverse.com 


In addition to downloading designs for 3D prints, I've been learning to model in 3D and create my own. A variety of online tools make this fairly simple and I've been able to make cases, test stands, 3D printer improvements and tools for other hobbies. Hopefully I'll have the opportunity to do more with this skill and sell some of the things I've created on Ebay and other online vendors.

Vintage and retro computers

 I'm not sure if this should be classed as technology or nostalgia. When I first started working with computers I was fortunate to encounter CP/M systems and some early UNIX systems ... I never forgot how simple and efficient those systems were and how much you could accomplish with modest hardware. Entire companies running on multiuser systems with no more CPU power than an Intel 486 CPU (Does anyone remember those?)

In order to restrict the collection I've focused on systems that were available around 1975, they're the same age as me.


MITS - Altair 8800: "The Altair is widely recognized as the spark that ignited the microcomputer revolution as the first commercially successful personal computer."

More importantly it has blinking lights and switches on the front panel, lots of lights and switches!

Real computers let the operator halt the system and patch programs in binary then restart the system where it left off.


CP/M existed before MS-DOS and, if you've ever used DOS, you'll find that its eerily similar ... almost as it Bill Gates copied most of the concepts from other earlier operating systems. 

In any case, CP/M has appeared in many different versions and even included multi-user variants. It ran on a large variety of hardware with different architectures and abilities. Code from one version of CP/M can be recompiled and ran on another.


I've enjoyed running favorite programs from my youth such as the original Infocom text adventures and programming in COBOL, FORTRAN and BASIC. You can even run simple programs programmed in binary on the front panel ... as long as you have the patience to toggle all those switches!

The picture to the right is my reproduction Altair 8800 system with DEC VT-220 monochrome serial display.


Digital Equipment Corporation - PDP 11/70: "The PDP-11 is a series of 16-bit minicomputers sold by Digital Equipment Corperation (DEC) from 1970 into the 1990s, one of a set of products in the Programmed Data Processor (PDP) series. In total, around 600,000 PDP-11s of all models were sold, making it one of DEC's most successful product lines. The PDP-11 is considered by some experts to be the most popular minicomputer."


The reproduction system I have was supplied in a kit and powered by a Raspberry Pi. The assembly was fairly easy, the most time consuming part was installing and aligning the switches and LEDS. The result was rewarding as it exactly resembles a scaled down version of the PDP11/70 with all the peripherals emulated that were available for the systems. I've yet to set this system up in a permanent home but I have another DEC VT style terminal for it to connect to and a DEC LP-50 line printer to round out the installation.


The PDP11 system allows me to run classic operating systems from the time such as RSTS and RSX11M. 

There are good development environments for FORTRAN and COBOL and DECs own variants of BASIC which are extended with additional function that hook into database like systems and external APIs. 

It can run as a singer user system or multiuser and it was this latter mode that allowed the PDP systems to run in businesses and universities, serving many users at once while running physics simulations, word processing, teaching programming or running administration systems.

Quicklook - Home Network Version 2

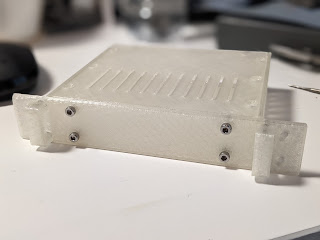
Raspberry Pi 4 case
Raspberry Pi 4 3D printed case
 The latest version of my home network was built in order to learn more about Kuberneties and clustering. It had the added advantage of unifying the processor type (arm64) across the network making automated administration slightly simpler. 

The primary core is a stack of Raspberry Pi 4 boards in custom 3D printed cases, loaded into a custom 6 inch (rather than 19 inch) rack. 

 Nocturna low speed fans were used to assist with cooling and airflow.


To store the various media files, backups and documents I decided to go with a clustered storage solution (clusters again!). 

I tried Ceph but found that the memory requirements exceeded the available memory on the ARM SBC boards I attached to the disk drives (Odroid HC2). 

I ended up using MooseFS and this worked out to be a good choice as MooseFS has been extremely stable both in operation and recovery from drive failures.

All systems run from 12V DC or 5V DC and will eventually run from a battery bank recharged by solar panels. 


Each 4TB disk in the storage cluster is housed in a heatsink and attached to an Odroid ARM64 single board computer. In effect this gives each drive its own 1GB network interface and an aggregate 8TB of IO bandwidth in ideal circumstances. 

To improve cooling I 3D printed cowls for each stack of 4 drives and installed low speed nocturna fans. Next step will be connecting the fans sensor lines so that it will gracefully shut down in the event that a fan fails.


I used the K3S Kubernetes distribution since it was optimized for smaller servers but still contained everything required for a full kubernetes stack. I've been able to run various workloads with no issues and run some of my permanent applications on K3S now. Its been a good learning experience, even if its a bit of an overkill for self hosting home applications.