Wednesday, October 24, 2012

Get your head in the cloud.

Even though my day job is completely centered around Information Technology I still miss changes and shifts in technology that happen practically under my nose. As much as I hear vendors speak about "The Cloud" I haven't had much time to investigate and discover if this "new technology" is something I can put to use.

If you already know what "The Cloud" is then you can skip the following paragraph, otherwise please read on:

The easiest way to understand the cloud is to think of it as a utility, like electricity. When you plug a device into a wall outlet, electricity flows. You didn't generate the electricity yourself. In fact, you probably have no idea where the electricity was generated. It's just there when you want it. All you care about is that your device works. Cloud computing works on the same principle. Through an internet connection (the equivalent of an electrical outlet), you can access whatever applications, files, or data you have opted to store in the cloud--anytime, anywhere, from any device. How it gets to you and where it's stored are not your concern (well, for most people they're not). 
By Rama Ramaswami, Dian Schaffhauser (http://campustechnology.com) 10/31/11

There is no end to the stream of interesting projects that are being developed "in the cloud" and its hard to keep track of them all. Some projects have turned into things that we're all familiar with; Flickr, Facebook & Twitter are a few examples. Some appear and vanish like the proverbial "Flash in the pan" and, since you generally lose access once they run out of steam, it can be disappointing if you have invested any time in those applications.

I've collected a few cloud based applications/services here that might be of interest to the radio amateur and/or experimenter. They look like they should stick around for a while and have already reached a fair level of maturity:

circuits.io: Described as a free circuit editor in your browser, it is actually a lot more. You can not only design practically any kind of circuit using just a web browser, you can turn that circuit into a printed circuit board and then BUY that PCB board online. Several different technologies had to come together to make this into an effective tool. This tool is fairly new but is becoming very popular. Hopefully it will stick around and continue to mature into something great.

WebSDR: While arguably not a "cloud application" it does allow you listen to software defined radios, using a web browser, from anywhere you have internet access.
There are multiple sdr receivers located across the globe using a variety of receivers and antennas. Some are tuned to the HF bands while others cover VHF & UHF bands.
This is an invaluable free service provided by institutions and individuals at their own cost.

APRS.fi: The distributed network of Automatic Packet Reporting System stations, repeaters, clients and map servers could be considered to be "of the cloud" before the cloud even existed. With an APRS equipped radio you can log your position from a GPS, over the air & through another ARPS receiver. This is then sent out (usually) across the internet to other systems which in turn can map your location or update other APRS clients or radios. APRS has also been extended to include the ability to text message which is particularly useful in locations where cell phone SMS messages or email are not possible!

Echolink: Like APRS, Echolink links the Internet to amateur radio. However Echolink links the audio and PTT (push to talk) signals from a radio or software client to a radio in another physical location. If you're stuck in a hotel room or another location without access to a radio you can still "get on the air" using an Echolink client on your Windows, Linux, iOS or Android computer & handheld device. Most Echolink connected stations are VHF/UHF but there are HF stations connected as well. Echolink is not designed to replace radio to radio communications but instead increases the connectivity of amateur radio operators and allows hams, who otherwise would not be able to operate, the pleasure of getting on the air.

As you can see, some of these "cloud apps" pre-date the idea of cloud computing by quite a while. Just another example of amateur radio folks being ahead of the curve without even realizing it.

Tuesday, July 17, 2012

The trouble with AppleTV

If you happen to use the AppleTV with Netflix you may have been suffering from the same frustration as I have in the last few months. Despite a 12Mbps internet connection, good WiFi signal strength and Apple Airport Extreme Wireless-N router I have been plagued with the dreaded pause & buffer while watching Netflix movies during prime time. This simply doesn't occur while watching the same videos, at the same time, on my iPad, iPhone, Mac desktop or PC laptop.

Perhaps the most aggravating part of the experience is that I think I have the problem worked out but I am unable to do anything about it.

It appears that Netflix have the ability to dynamically change the bandwidth used by each customer during peak times as well as the ability to set the bandwidth used by a customer based on the customers own available bandwidth. These mechanisms, working together, allow the largest number of customers access to Netflix videos and movies during peak times with only a slight degradation in video quality. Although I'm against throttling when used indiscriminately, this particular application makes sense, the alternative is that customers find themselves unable to watch movies during peak times or suffer timeouts or impossibly slow access. This arrangement works well on devices that use an up-to-date Netflix client or browser access, however the Apple TV is, at the moment, where is goes all pear shaped.

I noticed that the AppleTV Netflix app would never dynamically alter the bandwidth used by a streaming video once it had started playing, in fact it seems as though it always plays the video at the highest quality possible even when it would involve a significant time spent buffering before playing. If Netflix does dynamically reduce bandwidth during peak times it would make sense that the AppleTV, unwilling or unable to downshift to a lower bitrate, would start to suffer stalls and constant buffering as it starved for data. Needless to say, this results in a horrible experience for the viewer.

Something that was mentioned on the Apple forums also supported this theory. It was noted that changing the DNS entries could resolve this issue ... at least for a short while. This would make sense if the DNS server pointed to a different Netflix server address where there was less load, and therefore less throttling at that moment.

There are currently 45 pages of users complaints In just one thread alone on the Apple community forums and, as far as I can tell, nobody from apple has made a public announcement that addresses this issue. This doesn't come as a surprise as Apple is typically reluctant to discuss individual bugs and fixes in an open forum.

While people may patiently wait for fixes on iPhone & iPads, they may not wait for Apple to get their act into gear when there are better, less expensive, alternatives available that work well. I am seriously considering swapping out my AppleTv for a Roku 2 XD which, aside from working well with Netflix, has access to much more programming. It would be a shame to lose the ability to mirror the iPad or iPhone display but for the few times I used that feature, compared to all the times I want to sit down and watch a movie at night without having it pause randomly, the Roku wins.

Perhaps Apple will release a fix tomorrow ... perhaps next month. Its not knowing where they are at that cause so much frustration in the user community & that is not a good thing for a company that prides itself on making things that "just work"


Monday, July 9, 2012

The $20 Software Defined Radio

Introduction:

Despite my interest in boat-anchors I do find myself peeking 'over the wall' from time to time and taking a look at new and emerging technologies. After several demonstrations from friends I had become convinced of the incredible potential of software defined radios and even found thinking about owning one ... one day.

Perhaps the best known SDR in amateur radio circles are the FLEX rigs from FlexRadio. I had the chance to see a FLEX-3000 in use during Winter Field Day 2011 and had to admit that, barring the lack of knobs & dials, it was a very impressive rig!

One thing stopped me from running out and buying one straight away was the cost and perhaps the notion that once the new had worn off I would regret the significant outlay required to own the blue box. So, I shelved the idea of owning an SDR and found other things to occupy my time.

This changed when a post on www.reddit.com/r/amateurradio/ mentioned an unmodified digital TV receiving USB device that had been used as a software defined receiver in the 60MHz - 1.7GHz range. The best part was the cost, around $20 for most examples of this kind of device. Finally software & commodity hardware had come together to deliver useful receiver that everyone can afford.

The nuts and bolts:

There are specific parts required to put together your own $20 SDR but I will document what I used to get mine running and hopefully you can follow along.

Hardware: The device that I used was a Ezcap EZTV668 DVB-T Digital TV USB 2.0 Dongle purchased from DealExtreme. The part was shipped from Asia and I gather from reading else ware that DealExtreme is a middleman and not the actual supplier. Be prepared to wait a while if ordering from this supplier, my Ezcap took about 3 weeks to arrive but I have heard that a month or more is not uncommon.

The upside is that shipping is free and your purchase involves 0% tax, this really IS a $20 SDR.

This particular DVB-T dongle uses the RTL2832U chip which is required for use as an SDR, other dongles with this chip may work but if it does not have the RTL chip it will NOT work currently.

Software (Linux) : After poor results with the software running on MS Windows I moved across to Linux and got it working well there. I can't point you to a single howto for this because I used several different guides and tried a few things before it started working. The most helpful, and probably all you really need, are the build-gnuradio script which gets hardware support and gnu-radio running and the "Getting Started With RTL-SDR" page by Tom Nardi which covers installing Gqrx. All the software used is in development and requires familiarity with the command line to install and use at the moment.

Software (Windows) : I had another shot at getting the MS Windows software running and stumbled across the excellent website http://rtlsdr.org. Rtlsdr.org mentions using a new version of SDR# software which worked very well! 
I would recommend following the instructions under the Windows Software section, this had me up and running in a matter of minutes. Follow the instructions EXACTLY, I made life hard on myself by not paying attention to details and I think was responsible for my earlier issues.

Going further - Antenna : The stock antenna that is supplied with the Ezcap EZTV668 is sufficient for testing but you'll want to add something a bit more substantial for regular use. You may even want to remove the existing (hard to find) antenna connector from the board and install a standard connector and a less flimsy metal casing. This will help with RF shielding and temperature stability. 
If you are going to use a larger antenna, especially an outside antenna, you'll want to check to make sure a protection diode has been fitted to the input. The Ezcap EZTV668 is a very inexpensive device and others have found units in which the protection diode was not fitted to save costs.

Going further - 160M - 6M ? : I've just seen an interesting blog post titled FunCube Upconverter where the author, George Smart, has built a converter allowing the reception of 160M - 6M using the FunCube dongle. The FunCube is functionally the same as the RTL dongles available for $20. For any home brewers out there this could be a great project as George has included all the details including schematics and board artwork required to build the converter.


Update : Thanks to a link from Neil W2NDG to an EBay sale I've been able to track down a pre-assembled HF up-converter on this page : New HF Converter Kit for the SDR Fun Cube Dongle The price seems to be 45 euros, or about $55 US.

I've had a lot of fun using the $20 SDR to listen to AM aircraft traffic, local repeaters, emergency services and amazingly good quality broadcast FM stereo programming. Its easy to see, with an SDR, just how wide a radio broadcaster is transmitting and move your filter bandwidth to match.

Hopefully this is just the beginning of inexpensive SDR hardware that the radio community can re-purpose and re-engineer. 

Sunday, July 8, 2012

The KARS 2012 Summer Field Day Video

It took a little while but I finally got the video for the Katy Amateur Radio Society summer field day together. I didn't shoot as much video or as many photographs this year as I actually spent time a fair amount of time operating for a change!

Hopefully it will still be an entertaining, if short, reminder of those two days in June.


Katy Amateur Radio Society - Summer Field Day 2012 from Owen Morgan on Vimeo.


Wednesday, June 20, 2012

The unfortunate & epic saga of the perfect military radio

The long awaited but ultimately unwanted GMR radio
As my day job starts to include more long term projects & project management I was particularly intrigued by an article in arstechnica.com. The article is, "How to blow $6 billion on a tech project", although the title may be more inflammatory than technically accurate.

The article covers the 15 year development of an advanced & unified military radio communications system that suffered from multiple issues including scope-creep & a rapidly changing underlying technology.

If you are involved with a group that is working to develop a product or service you'll really get something from this article. If you interested in radio systems, military or otherwise, you'll find this interesting as well.

Its hard to image the frustration people suffer when contributing to a project that is mismanaged unless you have been there yourself. I hate to think of the wasted effort that resulted when people found out How to blow $6 billion on a tech project

Monday, June 4, 2012

The Johnson 275W Matchbox Antenna Tuner

I had purchased a Johnson Matchbox from an estate a while back & decided that while I was home with the flu I would open it up and check on its condition.

The Johnson Matchbox is found most commonly in two versions, the smaller "275W" unit and the larger Kilowatt Matchbox. Why did I use quotation marks around 275W? Well, these units were manufactured back in the good old days when men were men and transmitting voice meant using AM, not single side band. The conservative rating of 275W of AM translates into roughly 800W of peak SSB  (Not really but close enough so you get the idea)

Unlike many who own a Matchbox I was hoping to keep it 100% original and that it would contain all its original components, including the antenna change-over relay and wiring for the high-impedance receiver antenna connections. I plan to use this Johnson Matchbox with a Heathkit AT-1 transmitter and Hallicrafters SX-25 receiver so the inclusion of an antenna change over relay and 300 Ohm receiver connections will make life MUCH easier. Something I didn't realize until I had the unit apart (There are a LOT of screws holding this thing together) is that there is also a receiver control contact on the relay to break HT and mute the receiver during transmit which will work with my SX-25.

An initial inspection showed that the only modification was a small piece of plastic wedged into the relay contacts that held the relay in the transmit position. It was easily removed and the relay coil and contacts tested for continuity. The contacts seem a bit dirty which, from the little I have read online, seems to be a common problem.

Once the relay contacts and band-switch are cleaned I will button the unit back up and connect it to the loop antenna I have recently run around the eaves of the house. The loop has been a huge improvement to the long-wire and magnetic antennas I have run in the past, at least as far as reception goes ... but that is a topic for another post.

Saturday, May 26, 2012

Vacuum tubes could revolutionize computer chips?

No, I'm fairly sure I haven't lost my mind ... that really is the right headline.

According to a resent paper published in the American Institute of Physics, nanoscale vacuum "tubes" manufactured using conventional chip making techniques have operated at frequencies as high as .46 THz.

Dr. Meyya Meyyappan, Director at the Center for Nanotechnology at the NASA Ames Research Center, has highlighted the advantages of nanoscale vacuum devices which include resistance to hard radiation and significantly improved operating frequencies.

The increased operating frequency comes about because of the speed at which electrons travel through different materials. The speed of electron travel through silicon is comparatively slow, through graphine it is approximately 100 times faster and through a vacuum it approaches the speed of light.

While the cavity is not technically a vacuum it contains so few atoms of any other material, such as oxygen, it is functionally the same. This also gives the vacuum nanoscale device an advantage in space where hard radiation can disrupt an electron's travel through silicon leading to errors or sometimes permanent failure.

Dr Meyyappan estimates that vacuum nanoscale components will run ten times faster than the best conventional silicon chips and who knows what advances the future will hold. Faster chips will aid in signal processing and more capable software defined radios.

Do you want to monitor every CW & PSK31 transmission on the 40M band at once? With a vacuum "tube" rig you may be able to!

Sunday, May 13, 2012

Hollow state decade counter.

If you have looked through my blog you'll know that I have a soft spot for tubes and tube technology. At a time when our understanding of electron mechanics and quantum theory was still in development the manufacture of advanced vacuum tubes was part science, part physics and part art.
Special purpose tubes were developed in their thousands to meet the needs of commercial, scientific and industrial applications. Their form and functions were as varied as the devices they were installed in. Sometimes tubes were developed to meet a specific need and sometimes new tubes were developed for applications not yet in existence.
The E1T tube is impressive even among special purpose tubes. It functions as a decade counter with an inbuilt display! Many years later it would take several chips and associated display circuitry to achieve the same result using solid state components.
This is a somewhat long introduction to the excellent article by Ronald Dekker on the people and the story surrounding the development of vacuum tubes technology in Holland and the E1T tube in particular.
If you have a moment take a look at The making of the E1T by Ronald Dekker and revisit a time when electronics, physics and art were brought together to create 'technology for a better tomorrow".

Thursday, April 26, 2012

Something old, something new.

Something old ...

As a young boy in Australia my two favorite hangouts were my grandfather's shed or practically anywhere that electronics were sold. The two largest electronic component retailers in my home town were Tandy (Radio Shack) and Dick Smith Electronics. They both sold kits, tools, '100 in 1 Labs' and other assorted gear but Dick Smith eventually became known as the experimenters store due to their greater range.

Original Radio Shack calculator
Tandy is now almost vanished after their aquisition by Woolworths (Despite also owning its competitor Dick Smith) and has converted or closed most of the locations. 

One of the things I have to remember Tandy by is a handy resistor color code calculator. It saw a lot of use in past years while I built kits and experimented but not so much nowdays.

This device also calculated inductor values when flipped over which was handy for some of the older equipment I came across.

If you would like to make one of these yourself then Adafruit Industries has created a PDF document you can print and cut out for create your own resistor value calculator.

The PDF file is available from Adafruit Industries or a copy is also here. Once you print it out, a little cutting and folding should produce something like the example of the right. The Adafruit design uses brass paper fasteners (remember those?) but any fastener could be used that would allow the wheel inside to rotate freely. It would be best to print on heavy card stock if you have the ability as it will give the calculator some strength.

Something new ... 

If you happen to have one of those new fangled iDevices you can download Circuit Playground. It has a few more features than the old Radio Shack calculator and looks great on the iPad.


More features are being added but the list at the moment includes:
  • Decipher resistor & capacitor codes with ease
  • Calculate power, resistance, current, and voltage with the Ohm's Law & Power Calc modules
  • Quickly convert between decimal, hexadecimal, binary or even ASCII characters
  • Calculate values for multiple resistors or capacitors in series & parallel configurations
  • Store, search, and view PDF datasheets
  • Access exclusive sneak peaks, deals & discounts at Adafruit Industries
You can download it from the iTunes Store or, if you have an Android, you can check out ElectroDroid for similar functionality.

As time goes on there are more and more useful utilities available for electronic experimenters on iOS and Android devices. Since more and more equipment today is becoming computerized do iOS and Android devices  represent the future of test equipment?

iMSO-104 iPad Oscilloscope

Tuesday, April 10, 2012

The further adventures of the Heathkit AT-1

Work has been conspiring to eliminate my spare time but I was able to spend a few hours over the Easter holiday to clean up the shack and make space to put the Heathkit AT-1 on the desk again. I have been able to spend a little time going over parts that need to be replaced and making a list.

The Heathkit AT-1 chassis with case and VFO-1 behind.
There doesn't seem to be any show stoppers although the wafer of the meter switch has broken in two and will need to be repaired. If I'm not able to repair it then thankfully it is fairly simple and replacement rotary switch can be substituted.

This isn't going to be a museum quality restoration but the changes that were made to this transmitter in the past were sensible and if left in place are representative of period modifications. The original meter for example was not the highest quality and a Western or Simpson replacement would be an improvement. The original slide switches have been replaced with period snap-toggle switches which are also an improvement over the original.

The Heathkit VFO-1 however has been modified for grid-block keying which is a significant departure from the original and I plan to revert it back to cathode keying. Although a technical improvement it is not in keeping with the original design and needs to be undone. Everyone will have their own opinion but I think if I wanted modern circuits I'd get a more modern rig, so the VFO-1 will be returned to stock.

Hopefully I can carve out a bit of time here and there to work on this and slowly return it to working condition.

Monday, April 2, 2012

It's the future, where is my flying car?

It is the future and here is your flying car.


Although not quite the hover-car of science fiction and movies, it does fly like an light plane and drive like a car.  This will probably be the flavor of the future until we see the development and refinement of different propulsion technology.

The production prototype of the Transition® Street-Legal Airplane completed its successful first flight at Plattsburgh International Airport in Plattsburgh, NY on March 23, 2012.

Go to www.driventofly.com for more information.

Thursday, March 29, 2012

Birth of a Book - Smith-Settle Printers, Leeds, England

I'd love this video to be longer but as it is I still found it fascinating to watch a book come to life in a few minutes.


For the Daily Telegraph. Shot at Smith-Settle Printers, Leeds, England. 
The book being printed is Suzanne St Albans’ 'Mango and Mimosa' published as part of the Slightly Foxed series.
Shot, Directed & Edited by Glen Milner

Wednesday, March 28, 2012

Another hand-made vacuum tube!

Another hand-made vacuum tube video! This time it is a French amateur radio operator by the name of Claude Paillard creating a more familiar type of triode tube with a custom four pin base.


The video runs for approximately 17 minutes and is accompanied by an instrumental version of "The Man I Love" written by George Gershwin.

Tuesday, March 27, 2012

Now I understand - Measuring capacitance with a micro-controller

The excellent article by Rajendra Bhatt explains not only how capacitance can be measured but also how a micro-controller can be interfaced to an analog circuit to create a useful piece of test equipment.


Capacitance meter by Rajendra Bhatt
I found the explanation of the RC time constant method of measurement as interesting as the micro-processor project itself and congratulate Raj on demonstrating a practical and workable real-life example of what can normally be a dry textbook subject.

Click here : http://embedded-lab.com/blog/?p=4400 to read the article which includes everything you need to duplicate his project. 

The page is part of the excellent http://embedded-lab.com/ web site which is well worth a look. I know it is going in my bookmarks and RSS feed.

Monday, March 26, 2012

New season of Dr Who on the way ...

Watch the exclusive, just-released teaser trailer for the all new season of DOCTOR WHO, premiering later this year on BBC America!


http://doctorwho.tumblr.com
http://bbcamerica.com/doctorwho

In the words of The Doctor: "Anachronistic electricity, keep-out signs, aggressive stares - has someone been peeking at my Christmas list?!"

The new season will see the last days of the Ponds, with Karen Gillan and Arthur Darvill making their final rollercoaster voyage with The Doctor (Matt Smith). Amy (Karen Gillan) and Rory (Arthur Darvill) have been at the Doctor's side for more than two seasons but what will he do after their heartbreaking departure?

New guest stars so far confirmed to star will include David Bradley, Rupert Graves and Mark Williams. Season 7 will then see a dramatic turn of events when The Doctor meets a new friend - the recently-announced new companion, played by Jenna-Louse Coleman. Prepare yourselves for thrills, adventures and dramatic surprises as the show builds towards its enormous, climactic 50th anniversary year.

Fourteen big, blockbuster-movie episodes - each a brand new epic adventure featuring new monsters and some familiar foes as you've never seen them before.

And keep up with all of the best shows on BBC America by following us on Facebook and Twitter!

http://twitter.com/bbcamerica
http://www.facebook.com/bbcamerica

Wednesday, March 21, 2012

Ham Radio and Mesh Networks

Lately I've been fascinated by the capabilities of mesh networks. The ability to quickly create ad-hock computer networks could be an invaluable resource for amateur radio operators in general and particularly for emergency communications (EMCOM)

Linksys WRT54GL Router
The particular device and software I have been experimenting with is the Linksys WRT54G router and HSMM-MESH firmware from http://hsmm-mesh.org/.

Installing the HSMM-MESH firmware changes the way the Linksys router functions and allows it to automatically connect to other HSMM routers in a mesh network. No special configuration is required after setting your callsign. All TCP/IP configuration is pre-configured, even down to automatically assigning addresses to connecting clients.

Mesh Network Diagram
Mesh networks are highly fault tolerant. Every router in the network is aware of every other router and has the ability to move network packets through from one unit to another provided there is a link, or chain of linked routers, between them.
In the diagram to the right each router is represented by a numbered circle. If router number 6 were to fail then network packets that needed to move between router 1 and 7 would travel through routers 2 & 3 or 5 & 10 until 6 was repaired. All this happens automatically and quickly enough so that there is no disruption to the traffic.

Anything you can access on a normal computer network can be made to work on a mesh network. Some of the services that have been demonstrated include email, voice over IP (VOIP), video conferencing, file sharing, web servers & groupware applications.

With simple modified antennas the modest output power from the WRT54G (100 to 200mW) can be used to reach distances of many miles or tens of miles with directional antennas. Mounting the router on a mast in a sealed enclosure can reduce losses from long cable runs while running off 12V power makes them compatible with ham radio power sources including solar and wind power.

The example to the left is from NG5V located on hsmm-mesh.org and consists of an omni-directional external antenna and a lawn sprinkler controller box from a popular home improvement store.

Did you know that ... Frequencies used by channels one through six of 802.11b and 802.11g fall within the 2.4 GHz amateur radio band. Licensed amateur radio operators may operate 802.11b/g devices under Part 97 of the FCC Rules and Regulations, allowing increased power output but not commercial content or encryption.

I hope to acquire a few more WRT54G routers and put together a mesh network in the Katy TX area as a resource for experimentation and education in an area not normally touched upon by regular amateur radio operators. Who knows what the future holds & it behooves us to investigate this technology and bend it to our own needs.

The Amateur is Progressive ... He keeps his station abreast of science. It is well built and efficient. His operating practice is above reproach.

Monday, March 19, 2012

Geomagnetic data reveal unusual nature of recent solar minimum

An interesting article appeared on physorg.com yesterday regarding changes in the Earth's magnetic field and its relation to solar activity. Although short on detail it hints at significant changes going on within our sun.

Since the mid-1800s, scientists have been systematically measuring changes in the Earth's magnetic field and the occurrence of geomagnetic activity. Such long- term investigation has uncovered a number of cyclical changes, including a signal associated with 27-day solar rotation.

This is most clearly seen during the declining phase and minimum of each 11-year solar cycle, when the Sun's magnetic dipole is sometimes tilted with respect to the Sun's rotational axis. With the Sun's rotation and the emission of solar wind along field lines from either end of the solar magnetic dipole, an outward propagating spiral-like pattern is formed in the solar wind and the interplanetary magnetic field that can drive 27-day, and occasionally 13.5-day, recurrent geomagnetic activity.

Recurrent geomagnetic activity can also be driven by isolated and semipersistent coronal holes, from which concentrated streams of solar wind can be emitted.

During the most recent solar minimum, which took place from 2006 to 2010, however, several researcher groups noticed 6.7-day and 9-day recurrent changes in geomagnetic activity, and similar patterns in the interplanetary magnetic field, and the solar wind. Using modern data covering the previous two solar minima, these higher-frequency occurrences were judged to be unusual.

Love et al. analyzed historical geomagnetic activity records from 1868 to 2011 and find that the 6.7-day and 9-day recurrent changes were actually unique in the past 140 years. They suggest that the higher-frequency changes in geomagnetic activity are due to an unusual transient asymmetry in the solar dynamo, the turbulent, rotating plasma deep within the sun which generates the magnetic field.

More information: Geomagnetic detection of the sectorial solar magnetic field and the historical peculiarity of minimum 23-24 Geophysical Research Letters, doi:10.1029/2011GL050702 , 2012 

Provided by American Geophysical Union

"Geomagnetic data reveal unusual nature of recent solar minimum." 

March 19th, 2012. http://www.physorg.com/news/2012-03-geomagnetic-reveal-unusual-nature-solar.html

Saturday, March 17, 2012

Making a Type C Triode - Amazing Glasswork!

Ron Soyland is at it again and creating a Type C Triode vacuum tube. For a look at other creations click on Making a Spherical Audion Tube by Ron Soyland


A general purpose triode originally made for use by the Royal Air Force (Great Britain) in 1918 and designed by Captain H. Round of the British Marconi Co. around 1913. It is a triode that was meant for high gain high frequency use and has a 3 volt directly heated cathode.

Sunday, March 11, 2012

PC power supplies for Amateur Radio equipment?

I've noticed a few spirited discussions regarding modifying computer power supplies for use with Amateur Radio equipment. On the surface it seems as though they supply the perfect solution: Inexpensive, high current, regulated 12V DC supplies for a fraction of the cost of specialized amateur equipment. Is it really is as straight forward as lopping off a molex connector and replacing it with an Anderson Powerpole?

By design PC power supplies are designed to output a fairly well regulated 3.3V & 5V to the PC motherboard and 12V to the motherboard, fans and hard-drive motors. Modern units are typically rated anywhere from 75W to 1200W which should be a measurement of the output power available from all the 3.3, 5 and 12 volts. Since this isn't a lab grade power supply you can expect marketing hyperbole has perhaps inflated the power output figures.

Back when my job was to build PCs I had an issue with a server not being able to start its complete complement of disk drives. When I opened the case I found a 300W desktop supply board had been used in place of the 800W board ... sometimes you don't even get what you pay for!

Before you convert your first PC power supply there are two issues that may, or may not, cause a problem depending on your unit.

The first is load regulation or the ability of the power supply to maintain its rated voltage under load. If the output voltage drops too far your rig will shutdown, distort or fail to provide its rated output power.

The second issue is due to the high frequency switching circuits used in switch mode supplies. Depending on the individual power supply there can be adequate to no filtering to prevent radio frequency interference being broadcast to your receiver. Toroids on the input and output lines can help to reduce interference.

Because of construction differences between models and even between batch numbers for the same model you can never be certain how the power supply you purchase, or recycle, will perform. For the most part people's experiences have been positive but I have heard of power supplies that were unusable because of RF interference or such poor load regulation that the 12V rail dropped to 11V under load.

Without a motherboard presenting a load and supplying the power-on signal there are a few changes that need to be made to the power supply. Modern power supplies will not enable the 12V output unless the power-on wire is grounded and a load should be placed on the 5V line to help with regulation. Additionally there is usually an adjustment that can be used to raise the voltage above 12V

The following links detail the steps required to convert a PC supply for use with amateur radio equipment. Whether this represents a good investment of your time will depend on your desire to do-it-yourself and the quality of the power supply you begin with. I've heard strong opinions either way but I'll just say that, if luck favors you, you'll save some money and learn a few new skills in this exercise.

Computer Power Supply Converted for Ham Use

CONVERTING COMPUTER POWER SUPPLIES (Advanced with theory)

Converting Computer Power Supplies to stabilized 13.8 V DC 20 A

Tuesday, March 6, 2012

EICO Model 625 Tube Tester

I attended the Greater Houston Hamfest and as I walked past the tables of equipment I wondered if interest in vacuum tube equipment was starting to wane. Compared to the last few years the prices of collector quality gear had held steady but parts and restorable gear seemed to be going for less.  I'd like to know your thoughts if you've noticed trends one way or the other.

I was happy to pick up a EICO Model 625 tube tester for $15. It is in good condition and appears to work well. The roll of settings for each tube is in good condition and a little searching on the internet supplied settings for older tubes like the number 78 in the picture below.

EICO Model 625 Tube Tester with a number 78 tube
The EICO 625 is not a top of the line tester but it does basic tests and will let you know if a tube is functioning and an idea of the life left in it. It was sold in kit form for $34.95 in 1958 which is roughly equivalent to $274 in 2012.

Inside the EICO 625 from diyaudioprojects.com
The EICO 625 is fairly unique in having its own 6H6 diode tube to rectify the 30V filament voltage. It provides DC for the neon short-indicator bulb. If the tube is suspected of having a short then there is a fairly comprehensive series of tests than can be administered to isolate shorted elements.

EICO Model 625 circuit diagram
Here is the Users Manual and Roll Chart for the EICO Model 625 Tube Tester

Here is the complete TUBE TEST DATA 1/1/78 for the EICO Model 625 Tube Tester

Some settings for less common and older tubes are contained in : eico_625.zip

Excellent information on servicing and calibrating your Classic emission tube tester.

Monday, March 5, 2012

DIY Magnetic Loop Antenna - Part 3

Well, I finally have had time to sit down and put together part three of the DIY Magnetic Loop Antenna, sorry it has taken so long!

This post will cover building and coupling the loop to your transceiver. After reading through posts one and two you should have a good idea of the parts you'll use and the physical dimensions of the main loop.

DIY Magnetic Loop Antenna - Part 1
DIY Magnetic Loop Antenna - Part 2

Most magnetic loops have the capacitor at the top of the main loop and the gamma match or matching loop at the bottom, this arrangement avoids running the feed-line through the center of the antenna.

You can assemble the main loop from continuous copper tube or from eight straight sections and 45 degree joiners. Make sure you have a blow torch or propane torch to solder the joints as you'll need more heat than a soldering iron can supply. Whichever way you decide to build the main loop make sure that all joints are soldered or clamped as securely as possible, you want the lowest resistance possible to avoid your output power turning into heat. Other materials can be used for the main loop such as aluminium or low loss coax but copper pipe is easy to work, has low resistivity and available from just about every hardware store.

To construct the frame of the antenna you can use PVC pipe. It is a cheap and relatively sturdy building material and is available in a range of thicknesses, just about any hardware store will stock a wide selection of fittings. It insulates well and can be glued once you are sure your project is in its final form.

Once the main loop is constructed you'll need to connect your capacitor to the two ends of the pipe at the top of the loop. Depending on the capacitor you may want to solder tags to the ends of the loop so they will be easier to attach. Copper pipe is a great conductor of heat and takes a lot to heat up and solder while it is not advisable to apply the same amount of heat to your capacitor.
It is also a good idea to attach the capacitor to a solid support so that the connections are not under strain.
The main loop and the capacitor forms the resonant circuit of the magnetic loop antenna.


To couple the main loop to your transceiver and match the expected 50 Ohms impedance you can use one of two methods. Probably the easiest is to use is a loop of insulated wire 1/5 the circumference of the main loop. The smaller loop is placed at the bottom of the main loop and can be shifted around to provide the best match. If you have an antenna analyzer you'll be able to set it to the desired frequency, tune the variable capacitor for resonance and then move the small matching loop around till you have achieved close to 1:1 SWR. If you don't have an antenna analyzer you can tune the capacitor for the greatest received noise and then on low power tweak the capacitor and move the coupling loop around for best SWR. Do NOT touch the loop while it is transmitting, use a wood or plastic rod to make adjustments as there are high voltages and intense RF fields near the loop.
An alternative to the coupling loop is the gamma match. The shield of the coax feed cable is connected to the base of the main loop while the inner conductor is connected to a point approximately 1/5 of the circumference around the loop. Its a good idea to use stiff wire (large gauge) for the gamma match as it can be critical of the position and orientation and once you have it in the right position you won't want to move it again.
It would be preferable to have the ability to remotely tune the loop. A motor with a reduction gear could be used to move the variable capacitor but because the point of resonance is very narrow there should be a way of slowing the motor down. A simple control circuit using variable pulse width modulation could be used to slow the motor down while still retaining enough torque to move the capacitor. Whatever method is used to move the capacitor it should be well insulated from the other components of the antenna. Several thousand volts are generated on the MLA and care should be taken to ensure they don't find their way onto control leads and back into the shack. Control leads should also be wrapped around toriod inductors as they leave the near field of the antenna to reduce the possibility of RF travelling along them.

With a SWR bridge and microcontroller you could build a fully automatic tuner that swept through the range of the tuning capacitor when the SWR rose above a defined limit indicating that the transmit frequency had changed.

With a little creativity and knowledge you could have an impressive MLA the equal of multi-thousand dollar military style units.

Hopefully this has given you some ideas for constructing your own loop antenna. Regardless of if you go top-of-the-line and buy a vacuum variable or build for economy and QRP you'll have a compact, useful and unique antenna.

Tuesday, February 28, 2012

What has been happening?

Anyone looking at my blog could be forgiven for thinking that I had dropped off the face of the earth for a while, has nothing been happening in my world?

Well, the answer is that a LOT has been happening and all at once. My daytime job has become busier and there have been several non-radio projects at home that needed to be completed. All this has kept me away from Amateur Radio blogging even though I have spent more time on the computer than usual.

In between projects I did manage to stumble across this video of Rear Admiral Grace Hopper explaining just how "long" a nano-second is and what it looks like. This has relevance to radio as we're usually well aware of frequency and wavelength but don't usually spend too long thinking about speed.


From Wikipedia : Rear Admiral Grace Murray Hopper (December 9, 1906 – January 1, 1992) was an American computer scientist and United States Navy officer. A pioneer in the field, she was one of the first programmers of the Harvard Mark I computer, and developed the first compiler for a computer programming language. She conceptualized the idea of machine-independent programming languages, which led to the development of COBOL, one of the first modern programming languages. She is credited with popularizing the term "debugging" for fixing computer glitches (motivated by an actual moth removed from the computer). Because of the breadth of her accomplishments and her naval rank, she is sometimes referred to as "Amazing Grace." The U.S. Navy destroyer USS Hopper (DDG-70) was named for her, as was the Cray XE6 "Hopper" supercomputer at NERSC.

Thursday, February 23, 2012

Morsemail and LCWO.net

The time has come when I can't put off learning Morse code any longer, With an interest in vintage amateur radio and the impending restoration of a Heathkit AT-1 I'm going to need to use CW sooner or later.


So I have been checking out resources for learning Morse code and stumbled across two that really intrigue me.

The first is LCWO.net, a web browser based Morse code learning tool that is usable on any internet connected computer. It is available free of charge and there is no software to install. LCWO.net keeps track of where you are in your lessons and where you need to concentrate your effort. The Koch method is the primary tool available but they also offer code group practice, callsign and plain text training modes along with a service to convert text to Morse MP3s for download and use offline.

Once you are on the way to CW proficiency and want to communicate with others you can always fire up a rig and get on the air ... What if you don't have a rig or need a confidence boost before 'going live'?

Well, you could always send Morsemail using the Morsemail client from http://brasspounder.com:8873/.

Morsemail is, "A simple text format that encodes mark and space times to make it possible to send Morse coded messages via email" but a recently added feature allows for QSOs using a internet repeater hosted on brasspounder.com. You can use a mouse or actual key wired to the mouse or joystick buttons to send CW which can be emailed or sent through the repeater live.

Now I just have to carve out the time to sit down and use these resources!

Tuesday, February 21, 2012

DIY Magnetic Loop Antenna - Part 2

Part 1 of the DIY Magnetic Loop Antenna covered mostly theory and materials so now its time to move on to designing the magnetic loop antenna (MLA).

If you have priced a commercially made MLA you'll see prices start at $400 and keep going up, and up. If they cost so much you would think they must be difficult to build or use expensive parts, right? Well, it is certainly possible to spend more and get a higher quality MLA but a low cost MLA will still work very well.

For the purposes of this article we'll assume that you want to build a loop to cover the 20-10M bands. I'll run through the calculations required to build the MLA.

The required information for the MLA calculator is:
  1. Length of the loop
  2. The conductor diameter
  3. Frequency/s of operation
  4. Input power to the antenna
Lets pick some starting values
  1. We don't really know the best length of the loop at the moment so I'll pick 9 feet circumference as a starting point (It'll still fit in the trunk of my car)
  2. Since we seem to be having better luck with sunspots now I'd like to try 10M so we'll start with 29 Mhz as the highest frequency we'll use.
  3. I have some copper pipe left over from an ice-maker install, it is 1/4 (0.25) inch in diameter.
  4. Input power to the loop will be 100W.
Using the 66pacific.com calculator we get the following:
The comments section informs us that, "The specified conductor length is not idea" and we can go on to read that, "To avoid self-resonance, the conductor length for a small transmitting loop antenna should be less than 1/4 wavelength (less than about 8.23 feet at the specified frequency of 29 MHz)."

Well, I don't want the wire in the loop to resonate by itself, its designed to resonate in combination with the capacitor. Lets make the loop 8 feet in circumference and while I'm at it I'll make it out of 3/4 (0.75) inch copper pipe for better conductivity.

Lets see what we have now:
Well, that seems to have fixed the self resonance issue and we've managed to bump up the antenna efficiency to 91% from 82% ... not a huge increase ( About 0.5 dB) so I could use either diameter copper tube in this case. Everything looks good so far!

How about the 20M band, at 14 MHz how do things look?
So, the specified conductor length is not ideal but the comments section says were under the 1/4 wavelength at 17 feet. What is also tells us is that, "For highest efficiency, the conductor length for a small transmitting loop antenna should be greater than 1/8 wavelength (greater than about 8.52 feet at the specified frequency of 14 MHz)." 

That is OK, we know that the MLA is going to be less efficient somewhere in its range and the suggestion of 8.52 feet is close enough to our 8 feet we can ignore it. The 42% efficiency is not the greatest but -3.6dB is about half an S-Unit down so I'll live with that.

Just for fun I changed the copper pipe back to 1/4 inch and the efficiency dropped to 20% (-7 dB) so I think I'll stick with 3/4 inch. It makes more of a difference at lower frequencies since more current is flowing through the loop!

In order to tune the loop between 14MHz and 29MHz we look at the Tuning Capacitance value in the last two calculations above. At 29 MHz the tuning capacitance required is 19 pF and at 14 MHz it is 83 pF. 
This is well within the capacitance range of a normal air variable capacitor and in fact a larger capacitor with a maximum capacitance of 160 pF would allow you to reach the 30M band with reduced efficiency. 

Its important however to look at the voltage across the capacitor in our last two examples. At 29 MHz we'll see a Capacitor voltage of 2,562 volts RMS and at 14MHz we'll see a Capacitor voltage of 3,664 volts RMS.

What does this mean? In order to know what kind of capacitor would be best we need to know the absolute maximum voltage it will have to withstand before it arcs between the closest conductors. If the voltage is high enough it will 'leak' between the plates of the capacitor by breaking down the air between them and directly passing an electric current ... we don't want this to happen.

The breakdown voltage of air is around 3000V per milimeter (39/1000 of an inch = 1 mm). The voltage above is shown as RMS (Useful for power calculations) but we need to know the peak value which is higher and determines the maximum voltage. The peak voltage = RMS x 1.414 or 3664 x 1.414 = 5181 V peak. 

A peak voltage of 5181V will require a minimum spacing of 1.7 mm (peak voltage / breakdown voltage per mm) between the closest conductors in the capacitor. That would rule out an old air spaced variable capacitor from a vacuum tube radio but you could still use a wide spaced variable capacitor from an antenna matching unit or transmitter. A vacuum variable capacitor would be great (watch the minimum capacitance) or a home-made capacitor would also be fine provided you checked the breakdown voltage of the insulating material.

What if all you have is a capacitor with insufficient plate spacing for that voltage? If you reduce the output power to 35W then the voltage across the capacitor will decrease to 2168 V RMS which is 3066 V peak( 2168 x 1.414) This voltage requires a 1 mm plate spacing which is easily achievable with surplus capacitors. At QRP power levels (5 W) the voltage falls to 1160 V peak and requires only 0.39 mm between the plates, suitable for practically any variable capacitor!

The value of 3000V / mm is only an approximation and if possible use a capacitor rated for a higher voltage than you expect to run to prevent damage to your radio. Modern rigs have great protections circuits but they shouldn't be relied on.

Next post I'll cover building the loop and coupling it to your transceiver. Hopefully you found this information useful and if there are mistakes or inaccuracies you'll drop me a line and set me right.

Friday, February 17, 2012

DIY Magnetic Loop Antenna - Part 1

Do you live in a neighborhood with a restrictive antenna policy and despair of having a useful HF antenna?

Can you solder or know someone who can?

A magnetic loop antenna may be the answer and they are not as difficult to build as you might think. Like getting on the air for the first time or taking your license exam there is a certain amount of uncertainty when you first approach magnetic loop antennas, there are a few new ideas to grasp. However, thanks to other hams like Steve AA5TB there are tried and tested designs, calculators & building methods that are known to work and that you can follow.

At the heart of every radio and MLA (Magnetic Loop Antenna) is the resonant circuit. The combination of an inductor (a wire has inductance, but a coil of wire has more) and a capacitor (two conductors separated by an insulator) in a circuit will resonate or 'ring' at a certain frequency. Sound vibrations at a certain frequency can cause a piano string to vibrate in sympathy and a vibration of the correct radio frequency will cause a resonant circuit to electrically vibrate in sympathy.
Since there is no such thing as a free lunch, the sacrifice you make with a MLA is that it needs to be re-tuned whenever you change frequency on your transceiver. The frequency range over which it is resonant is very small, typically only a few hundred kilohertz at the most.

The materials you can get your hands on is going to decide the capabilities of your MLA. Ideally you'll have a loop made from a conductor with very low resistance (usually copper) and a capacitor that can handle high voltages. A variable capacitor is required if you want to use your antenna on multiple frequencies but you can use or make a fixed capacitor if you operate on one frequency, for Eg PSK31.


A MLA calculator like the Excel spreadsheet from Steve AA5TB or this web page from 66pacific.com will help you to decide what size components you'll need to make your antenna.

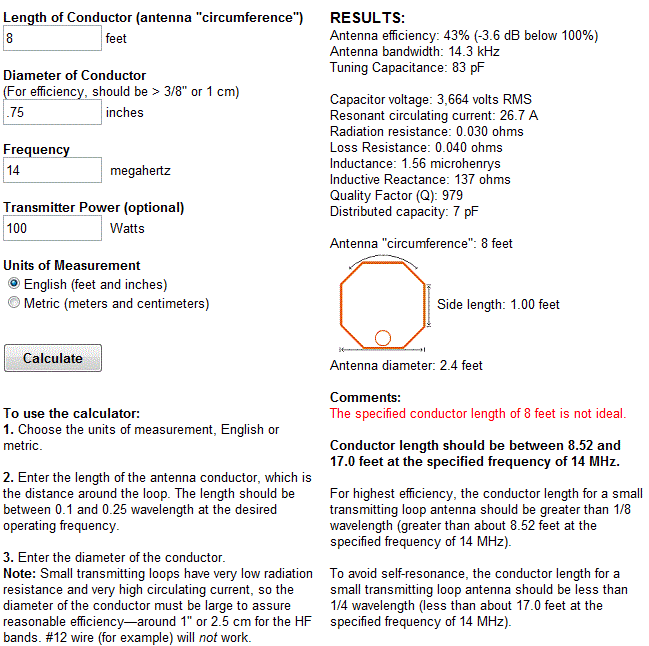
The four pieces of information required are:

  1. What frequency or frequencies do you wish to transmit on?
  2. How large do you want the loop to be (It should have a circumference less than 10% of the design frequency wavelength, both calculators help you figure this out)
  3. The diameter of your conductor (Three quarter inch (0.75 inch) copper pipe is a good start)
  4. How much power you want to use (The voltage across the capacitor is proportional to the input power to the MLA)
A MLA of a certain circumference will be more or less efficient based on the frequency you transmit at. It is worth changing the loop size in the calculator to get the best efficiency possible in your favorite band. 
For example, my 30-10 Meter loop is 8.5 ft in circumference and 23% efficient at 10.1Mhz but 91% efficient at 28Mhz. This represents a difference of about 6dB or 1 S-Unit.

The diameter of the conductor determines its resistance and this becomes important due to the large current flowing through the loop. Large diameter copper pipe is better since the radio frequency current flows primarily on the outside of the conductor rather than the core. Typical 3/4 inch plumbing pipe is a good balance between low resistance and weight, Heliax coax is good for portable antennas where the loop has to be rolled up into a compact space.

Probably the most problematic part of the MLA is the tuning capacitor. While everything else can be found in your junk box or on a shelf at the local hardware store the capacitor takes a little more digging. Ideally it should be variable from a minimum to a fairly high capacitance (0-300 pF would be good) it should also be able to withstand high voltages. If you are planning to run 100W then you could expect at least 4000 volts across the capacitor. This is not as bad as it sounds as it takes 3300 volts to jump just 1mm or .04 of an inch.

Ideally you could purchase a vacuum variable capacitor, the Rolls Royce of high voltage variable capacitors. You would expect to pay anywhere from $100 up when buying a 10 - 500 pF unit on Ebay and a LOT more if you buy new. If that is the way you want to go then great, you're all set. If not then read on ...

There are several alternatives to the vacuum variable capacitor that will work almost as well. The primary concern now becomes resistance and plate separation. For QRP power levels you can use the tuning capacitors from old vacuum tube radios, the type that have a set of fixed metal plates and a set of moving plates that mesh into them.
For higher power there are two other types of capacitor that are suitable. 
One is the split-stator capacitor, so called because each terminal of the capacitor is connected to a stator that is electrically isolated from the other and the frame. The rotors and shaft form the rest of the circuit so there is very low resistive loss and no sliding contacts.
The other type is called a butterfly capacitor due to the shape of the rotor plates. In this type the stator plates are placed opposite each other with the butterfly rotor in between. When each of the butterfly "wings" are fully meshed between the stator plates the capacitor is providing maximum capacitance, when rotated 90 degrees the wings are completely un-meshed and the capacitor is providing minimum capacitance. Because of the construction of butterfly capacitor there is a higher minimum capacitance that should be noted when planning the frequencies your loop will cover.
If all else fails then you can construct your own variable capacitor. The idea is to have two conductors separated by an insulator, the larger the area of the conductors and the better the insulator the higher the capacitance. Sliding metal plates, trombones of copper tube and even Coke cans have been used as variable capacitors.

A fixed capacitor can be created out of coaxial cable if you intend to operate on one frequency and a table of approximate capacitances for different types of coax is included here, click to enlarge the table below.

You can cut a length of coax a bit longer than the length suggested by the table above and trim it to frequency once it is attached to the loop. Make sure there are no stray pieces of braid between the shield and the center conductor as the voltage rating is determined by the spacing of the two closest conductors.

Part two of this post will continue with calculating the antenna dimensions and performance.

One important thing to remember ... If you don't have access to the best materials then use what you have and improvise. If you don't have copper pipe then use coax or heavy wire. If you don't have a high end variable capacitor then use what you can find and keep the power levels QRP. The only antenna that is a complete failure is the antenna you never get around to building.